
Hey, my name is Sharon Milne and I go by the moniker ChewedKandi. I have a passion for vector art and have been creating digital art portraits and illustrations for the past decade. I’m self taught in the programs I use and especially love teaching others the benefits and wonders of Adobe Illustrator. All the vector work I produce is 100% vector with no raster effects.
I now write tutorials and articles for sites such as VectorTuts+ and produce a variety of pieces for commercial and private clients.

I wanted to create a vector portrait with some of the facial features exaggerated, specifically the eyes. I had previously created a vector portrait in this style so I wanted to see if I could pull it off again. This time around, I wanted to make the focus the eyes.
I picked out a stock image by Dagwanoenyent-Stock, one which I had previously seen and it had stuck in my mind.
My tools of the trade are: Adobe Photoshop CS4, Adobe Illustrator CS5, A5 Wacom Bamboo... as well as a large glass of Dr Pepper Zero and the odd cat jumping up on my desk to try and play with my stylus!
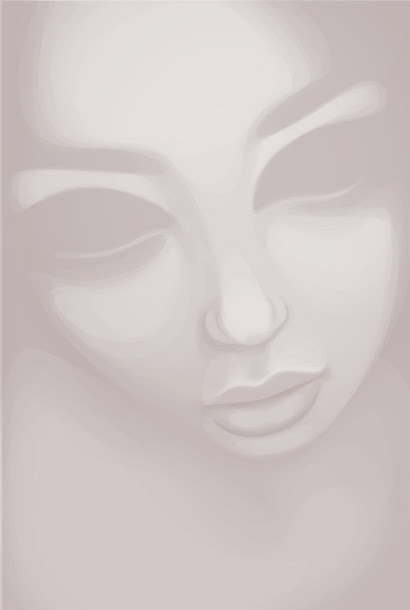
Step 1
By using the lasso tool to select areas and enlarge and shrink them, duplicating and flipping areas, I got a rough idea of what I wanted the piece to look similar to. My reference images post Photoshop aren’t the most polished of images, but they do what is needed. I get a rough idea of the dimensions of the face and a rough idea of the shadow/light cast on the face.
I use the smudge tool to smooth out some of the areas to make the curves of the face seem more natural. Then I go into using colour balance and brightness/contrast to modify the colours slight.

Step 2
Now my reference image is ready for Illustrator. Using the reference image I begin with doing some base layers which split the face and the neck/chest in two layer folders. I begin adding low opacity layers to build up on the shading. I use the reference image for each shape to make sure I’m following the curves of the face and lighting. Throughout this step I’m using only 2 colours, the base and the shading colour, no gradients or meshes are used at this point.

Step 3
Thankfully due to completing many portraits, I’m able to not need to refer to the reference image now until later on. I begin adding lighter coloured shapes to give the skin shading more depth and to highlight features such as the nose, top lip and brow bones. I’ve now used my 3rd colour and still not using gradients or meshes.
Step 4
Now I begin to add transparent radial gradients. I still use the same 3 colours I’ve previously used but changing the blending modes. Due to the neck area and face area being in separate layer folders, the shading is easier to do on the neck to give clear definition to the face/jaw line.
I use light transparent gradients to highlight areas on the face, again using the same colours previously used; just changing the blending mode.

Step 5
As the skin has a variety of tones and I don’t wish for the portrait to be too porcelain in appearance, I begin add blends within clipping masks to give blush to the cheeks, greys to the corner of the eye socket and more highlights on the chest area.

Step 6
As I’m feeling the skin is almost complete, I begin to work on the lips more in detail. Using transparent gradients on a variety of blending modes, width profile brushes and many circles, I add shine and a dash of colour to the lips. In general when I’m shading skin, I see the lips as part of the skin and make the basic contrast while rendering the skin. This is so the lips don’t look as if they are floating on top of the skin.

Step 7
I add further colour and some highlighting lines to give the lips a bit more of a shine and gloss appearance as well as a slight light reflection on the tip of the nose. This gives the nose a bit more definition.

Step 8
I now refer back to the reference image to get the basic shapes of the eyes and basic details. I lower the opacities of the majority of the shapes so I can get a good idea of the colour effect I want to go for. I don’t copy and paste the eyes as I don’t wish for them to look perfectly identical, however whatever I do to one eye, I do to the other so the effects are balanced.

Step 9
I now add transparent radial gradients, brush strokes and dots to add detail to the eyes. I use a variety of blending modes and opacities to give an interesting contrast effect. The strokes within the eyes are of a variety of colours and thanks to the lower opacities and gradients behind, they give a great effect.

Step 10
Further transparent radial gradients and a variety of solid colour low opacity shapes to give further depth and detail to the eyes. I use many radial white gradients around the eyes to give a subtle highlight effect. This method was also added around and on the lips to give a highlight/sparkle to them. This also softens any harsh lines.

Step 11
Now adding eyelashes to frame the eyes using the same width profile brushes with a variety of weights and colour.

Step 12
I want to give a frame to the portrait using plain white hair so I try out a very basic style of hair. I don’t want the hair to be too detailed that it takes away from the eyes. So I use a white stroke rectangle to first frame the vector then build on it with strands of hair. I also add further colour to the lips to give them a little more attention.

Step 13
I try adding the eyebrows, however once added it makes the hair look too simple and I feel I need to change the hair. Upon showing it to a friend he confirms this and it’s back to the drawing board!

Step 14
After playing around with some sketches of framing hair and adding a few more gradients to give more depth in the skin, I add basic shapes to give a larger frame. With the hair in this style I feel it draws the viewer into the face and onto the eyes... which as I say I want as the focal point!

Step 15
I add further details to the hair to make the base layer shape of the hair less chunky and add a beauty spot near the mouth. A lot of my portraits include moles and beauty spots as they have hidden meaning where ever they are situated. Although from time to time in my non-conceptual pieces I place them purely to highlight an area of the portrait. In this case, I want to balance the eyes and lips slightly so I place it on the top lip area.
This completes my vector piece.